So I am very sorry guys, but I have recently been busy with lots of exam preparation so my blog has taken a back seat. So I thought considering around this time of the year lots of people are currently preparing for mock exams or even their finals, I would do a post about my top tips for revising!
My main tip would be think positively
Honestly it sounds like a load of nonsense but you will not get anywhere if you keep putting your self down! This is something that I will put my hands up to and admit, I spend a large percentage of my time getting annoyed with myself because I feel that I cant work simple things out! After a while I do realize that I am jut over thinking things, which I almost always end up doing!
Make notes & KEEP THEM!
Everyone makes notes, but do you keep them? I personally have a set of revision cards that i look back over, some are saved on my phone and some are on normal hard back paper. Wherever you like to keep them or however just save them to look back onto!
Revise with friends
I find the best way to take in important information is testing my self, but I can never concentrate enough on my own so end up having a friend beside me to entertain me. Otherwise i will end up getting board or wound up easily.
Find your technique
So it's easy to say I know, it took me about a year to realise that making notes and then testing myself is my best way of learning. However I also need a fun environment, meaning I can laugh about things, then link memories with answers.
If its any help i know that there are quiz's that determine what type of learner you are, you should really give them a go!
So I hope this helped you guys and I apologize once again for my inconvenience, I promise within the next week I will publish a brand new post that I am currently working on!
Lots of Love A.
xoxoxo
Sunday 26 January 2014
Saturday 4 January 2014
Autumn/Winter look
My beautiful model for this look is my niece Charlotte, she is extremely fortunate as she seems to look pretty amazing when put in front of a camera.
So as I previously took modelling photos of her for my art coursework she was more than happy to model for my blog, with only the smallest amount of persuasion;)

The first step was to apply a base coat, I used the Maybelline-dream satin foundation. I applied a medium/thick layer (with a real techniques foundation brush) It creates a nice matte base that is easy to blend any blush and eye shadow in with.
The next step was the eyes, I wanted to use quite subtle colours to start with and then build it up. I used the pale brown shade (almost white) that came in the nude naked pallet and applied it from the bottom of the eyelid up to just below the brow.
I then did a thin line across the bottom of the eyelid, just above the eyelash line, finishing with a small cat flick. I used black eyeliner, but you may prefer to use brown if you are looking for a more subtle look.
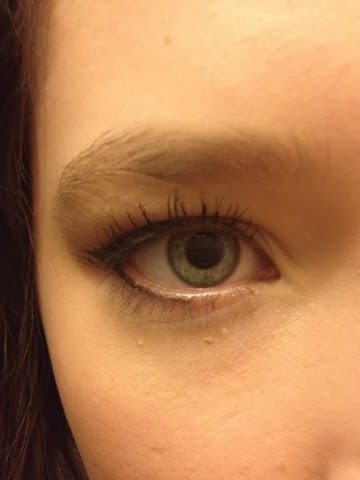
This parts all about building it up gradually, now to start with it may look quite strange but once you have added all of the different tones it should leave a nice glowing natural looking eyelid. You basically need to keep applying different brown shades, pale on the the main eyelid, then in the crease blend in a dark brown colour. Sometimes if my eyes look particularly tired I will highlight the inner corners of my eyelid and just below my brow line. Once you've built it all up it should look something like this, obviously with mascara already on them.
Now I apply the blush, my aim is to achieve a warming look so i'm using a deep pink blush and outlining the cheek bones with my bronzer.
The last part of this look is to use a cherry lipstick or lip gloss I feel this completes the make up and adds a nice comforting effect to it.
 I completed it by putting Charlotte's down, this is a easy and pretty hairstyle that I think can go with an everyday look.
Her outfit is my favourite style, skirt, tights, socks and boots. I paired these with a simple black scarf with bows on and any top that suits you.
I think for this sort of outfit the less jewelry the simpler and more cozy you look. So if I was to wear any at all it would be some pretty earrings, neck less, a bracelet and rings.

Lot's of Love A.
xoxoxox
So as I previously took modelling photos of her for my art coursework she was more than happy to model for my blog, with only the smallest amount of persuasion;)
The first step was to apply a base coat, I used the Maybelline-dream satin foundation. I applied a medium/thick layer (with a real techniques foundation brush) It creates a nice matte base that is easy to blend any blush and eye shadow in with.
The next step was the eyes, I wanted to use quite subtle colours to start with and then build it up. I used the pale brown shade (almost white) that came in the nude naked pallet and applied it from the bottom of the eyelid up to just below the brow.
I then did a thin line across the bottom of the eyelid, just above the eyelash line, finishing with a small cat flick. I used black eyeliner, but you may prefer to use brown if you are looking for a more subtle look.
This parts all about building it up gradually, now to start with it may look quite strange but once you have added all of the different tones it should leave a nice glowing natural looking eyelid. You basically need to keep applying different brown shades, pale on the the main eyelid, then in the crease blend in a dark brown colour. Sometimes if my eyes look particularly tired I will highlight the inner corners of my eyelid and just below my brow line. Once you've built it all up it should look something like this, obviously with mascara already on them.
Now I apply the blush, my aim is to achieve a warming look so i'm using a deep pink blush and outlining the cheek bones with my bronzer.
The last part of this look is to use a cherry lipstick or lip gloss I feel this completes the make up and adds a nice comforting effect to it.
Her outfit is my favourite style, skirt, tights, socks and boots. I paired these with a simple black scarf with bows on and any top that suits you.
I think for this sort of outfit the less jewelry the simpler and more cozy you look. So if I was to wear any at all it would be some pretty earrings, neck less, a bracelet and rings.
Lot's of Love A.
xoxoxox
Friday 3 January 2014
Real Techniques- Expert face brush
This brush is an absolute miracle worker, I love it.
I use it for my liquid foundation as I find it is good to massage into the skin in a circular motion, it is definitely the best make of brushes I have used before and I am going to be looking into other brushes by real techniques.
The brush it's self is very smooth and does not leave any traces of bristles on your skin, I struggle to find any like this.
 So we all know that the Real Techniques brushes can be very expensive and i did get this as a present so I didn't actually pay for it. I only have this one brush and will definitely be saving up for more by this make (blush, eye, powder) because i do think that they are very much worth it!
Applying foundation:
1. So first off you may want to apply primer, this is a simple base coat that helps your foundation stay on.
2. Then I apply concealer under my yes and over any blemishes.
3. I then apply 2-3 pumps of foundation on the back of your hand (ish sorta hard to explain where about..)
4. finally apply the foundation in a circular motion with this brush, what i try to do is blend it in the direction of my pours (this is difficult to see, but does look smoother and better)

Lots of Love A.
xoxoxo
I use it for my liquid foundation as I find it is good to massage into the skin in a circular motion, it is definitely the best make of brushes I have used before and I am going to be looking into other brushes by real techniques.
The brush it's self is very smooth and does not leave any traces of bristles on your skin, I struggle to find any like this.

Applying foundation:
1. So first off you may want to apply primer, this is a simple base coat that helps your foundation stay on.
2. Then I apply concealer under my yes and over any blemishes.
3. I then apply 2-3 pumps of foundation on the back of your hand (ish sorta hard to explain where about..)
4. finally apply the foundation in a circular motion with this brush, what i try to do is blend it in the direction of my pours (this is difficult to see, but does look smoother and better)

Lots of Love A.
xoxoxo
Subscribe to:
Posts (Atom)